Showing posts with label tradition. Show all posts

Tuesday, November 26, 2013

Holiday Baking: Old School Pumpkin Pie

I've never made a pumpkin pie. This is primarily because I've never had a pumpkin pie that I like as much as a good fruit pie. So, for the holidays, my counterpart gets what was traditional for my family growing up in close proximity to Wisconsin's cherry orchards - a nice tart cherry pie. Even on Thanksgiving.

This year I decided to give the man a break and muster up a home made, fresh pumpkin pumpkin pie. I always kind of liked my mom's approach. She uses a standard recipe but doubles the spice except for the clove, which she halves. This creates a nice spicy pie. But, there's still something weird about the texture of most pumpkin pies. Maybe it's the prevalence of canned pumpkin?

I did a bit if research and found an old-school recipe for pumpkin pie on the Food52 blog. And, by old school, I mean it predates the era in which I was raised, where condensed milk was as ubiquitous in the kitchen as flour, sugar, and eggs. I feel as if the women who raised me put that stuff in everything. My first fudge recipe called for a fair amount of the stuff.

And, maybe this is also part of my issue with pumpkin pie. I can't get beyond that tinned milk flavor of so many fillings. So when I found a recipe that used good old fashioned cream, I knew I had a winner.

Food52 attributes this recipe to Meta Given, who published the two-volume Encyclopedia of Modern Cooking sometime in the 1940's. It calls for caramelizing the pumpkin, as well as limiting the spice to cinnamon and ginger. It also bakes in about 25 minutes.


For Meta Given's Caramelized Pumpkin Pie you will need:

A 9-inch pie pan lined with pastry (I like the Deluxe Butter Pastry from Joy of Cooking)
1 3/4 cups cooked pureed pumpkin
3/4 cups sugar
1/2 teaspoon salt
1 teaspoon ground cinnamon
1/2 teaspoon ground ginger
2 eggs
1 cup cream
1/2 cup milk

To prepare the pureed pumpkin, you'll want a sharp knife, a kitchen shears, and a vegetable peeler. First, cut the pumpkin into quarters and use the kitchen shears to cut out the seeds an all those little threads. Then, use the vegetable peeler to peel the skin. Roast them in the oven at about 350 until the internal temperature of the pumpkin is 140 or so. While your pumpkin is roasting, you can prepare your crust.

When your pumpkin is out of the oven and has cooled a bit, use a parking knife to cut it down into smaller pieces. Then mash it with your potato masher before pureeing it with an immersion blender.

Make sure to roll out your pie crust and get it in your pie pan before you start the filling. This comes together quickly, and the recipe calls to pour the fresh-from-the-stove-top filling into a chilled pie shell. So, get your crust in your pie pan and place it in the freezer to chill while you make the filling. Also, I made enough pie crust for two pies. This is a good thing to do if you are making a recipe for the first time, or if you are a holiday baker only and haven't really baked since new year's brunch. This way, if the pie doesn't turn out, you've got another crust on hand to quickly try again.

Here's something else that will help, especially with this recipe. Basically, you've got three main components: the pumpkin, your dry ingredients, and your wet ingredients. Premix the sugar, salt, and spices and set aside. Then, beat your eggs and pre-mix the egg, cream, and milk.

Now you are ready to caramelize your pureed pumpkin. Place it in a heavy saucepan over direct heat. I started mine out on high heat and watched while it looked (and smelled) like it was scorching. It stuck to the pan and really made me more than a little anxious. So, I turned the heat down a bit and kept going. The recipe says it should take about 10 minutes to caramelize. And, after about 5 minutes, the scent changed, and it did indeed begin to smell a bit like caramelized sugar. After about 8 minutes, the pumpkin was starting to brown and had achieved a slightly dry texture.

Caramelized Pumpkin


Remove the pumpkin from the heat and fold the sugar mixture into the still-hot pumpkin. Use a good spatula, too, as the sugar is going to react with the hot pumpkin. As I mixed the sugar, I noticed that all the pumpkin residue that I saw sticking to my pan came right off and mixed in with the rest.

With sugar and spice


Once everything is well combined, mix in the cream mixture. I used my immersion blender, but a hand mixer would probably be more appropriate.

With cream and egg mixed in


Now, here's the second area of concern for me. The filling is liquid. Like really liquid. I got a little concerned that I had skipped a step or something. But, no, it is supposed to be this way. There are eggs in there, and they will cook. So, I removed my pie shell from the freezer and used a small soup ladle to gently transfer my steaming hot pie filling into the very chilled pastry, ladling some off into a small glass dish to serve as a taste test. This is another good thing to do if you are trying a new recipe as it gives you a chance to sample the filling before the pie is out on the table in front of guests.

Ready for the oven


Bake the pie in a pre-heated 400-degree oven for about 25 minutes, or until the filling has set. The recipe says this is when it is slightly jiggly and the area in the center is still liquid. It also says that a pumpkin pie that has been cooked properly has a smooth surface that has not cracked. My pie cooked in about 30 minutes and was somewhere in between these two guide posts.

Plus, it looked burnt. So, after allowing my taste test some time to cool, I gave it a try. This is a unique pie filling that does indeed taste strongly of pumpkin. The light spicing of ginger and cinnamon allow the actual flavor of the pumpkin to dominate, as the recipe promised. Plus, there is an undertone of caramel that is subtle but noticeable. The texture is clearly an egg-based filling, although not quite a custard. Overall, I am pleased. I hope my counterpart is also.


The finished product


Sunday, November 17, 2013

All About the Gravy

Thanksgiving is about 10 days away, so it's time to get serious about cooking again. The nice thing about Thanksgiving is that it is really all about the meal - that opulent turkey dinner that most of us only muster this one day of the year. And because that turkey is really the cornerstone of the day, you want to bring your A game.

To help prepare for this major cooking event, today's posting is all about the gravy.

Perfect giblet gravy


But first, an important note about the turkey, because the wrong bird will stop you dead in your tracks. I bring this up because over the last few years I've seen an increase in turkeys that come with a sad little packet of pre-made gravy instead of the traditional packet of neck and giblets. Read the packaging carefully and make sure you pick up a bird with the giblets. Pull them out of the carcass, and trim the ends off the wings, and set them all aside for a moment.

Here's also a nice trick for roasting that will keep the bird moist and flavorful. Turkeys are pretty lean and are prone to drying out in the cooking process. While a free range bird is less likely to dry out than conventional birds, many of us keep it from drying out by adding fat like butter. Put the butter away and try this: Mix dried rubbed sage and salt into a couple of tablespoons of duck fat and rub that on the exterior of your turkey. Duck fat is easy enough to come by. Sometime between now and Thanksgiving, pick up a duck and treat yourself to a duck dinner. Drain off the fat and save it until Thanksgiving.

Neck, giblets, wing tips, and butter

Once the turkey is in the oven, go back to those giblets. Now, most of us just cover them with water and leave them on the back burner to stock all afternoon. The key to a really flavorful giblet gravy is to brown them first - neck and all - in about a tablespoon of butter with some more sage and maybe a bit of oregano.


Mirepoix

A bit if veg will also boost up the flavor. You'll want to add some carrot, leek, onion, and celery hearts as if you were preparing a mirepoix. Let the veg cook until softened. Then add a couple of cups of water to the pot and throw in about half a bullion cube. Now you can set it aside to simmer while the turkey roasts.


Giblet stock


When the turkey is cooked through, you'll want to let it rest for a moment. While it is resting, go ahead and cut off some of those nice fatty bits near the butt. And, if you really want all those juices, pull the stuffing and turn the bird on its end to let everything drip down into the roasting pan.


Letting gravity do its thing


With giblets, stock, pan drippings, and some nice fatty meat, you are now ready to make your gravy. You will also need flour, butter, olive oil, heavy cream, and some variety of flavoring like Worcestershire sauce. We use a bit of sriracha sauce and some Pik-a-Peppa.

A little extra flavor


Start with a simple roux. In a heavy pan, melt down 3 tablespoons butter and 1/2 tablespoon olive oil. Add to that about 4 tablespoons flour and mix with a spatula until the flour has blended with the fats and has cooked off. This is important because cooked flour makes sauce but raw flour only makes paste. Mind the heat so that you don't end up at the other extreme with scorched flour as this is not appropriate for this application.

Cooked flour makes a sauce


Add your flavoring to the roux along with some heavy cream.


Then, remove your turkey from the roasting pan and place it on a platter because it's time to add the drippings.

Pan drippings


Use a spatula to scrape everything off the sides and bottom of the pan and carefully pour it into your gravy. Then, take those giblets off the back burner and strain the stock into the roasting pan to deglace the remaining sucs and add this to the gravy, keeping the heat fairly low.

Making use of the giblet stock


Now, before you add the giblets, you'll want to get out the immersion blender to smooth out the roux. If you have a uniform texture to your gravy before you add the meat, your gravy will be much more like a sauce. Which is actually what it is.

Emulsification


You'll now want to mince the giblets and that fatty turkey butt meat and add them to the pot. And, finally, you'll take on the neck. This will need to be done by hand to ensure you get the maximum amount of meat without also getting any of the bone. And it's worth it. This is some tender flavorful meat. Carefully pick as much as you can from the neck and mince it up before adding it to the gravy.


Giblets


Neck meat


Just needs a quick stir


Give everything a good stir. If it is not as thick as you'd like, get out the potato starch.You can find this at Asian markets, as well as at some kosher grocers. Mix a little with some water before adding to your gravy; then give it a couple of minutes to thicken up.

And, that is the perfect Thanksgiving gravy.

Sunday, March 31, 2013

Limas and Ham

Anyone who grew up eating dinners that featured the Birdseye frozen vegetable medley like I did have no doubt ended up with a serious hate on for lima beans. I know I did. Then during the winter that is coming to a close, my counterpart introduced me to the dried variety that you cook at home however you damn well please. And, in fact, he cooked them in a cassoulet and they were excellent. The difference  between the sad little limas in the Birdseye bag and the ones you cook at home is as stark as the difference between the equally dismal corn in that medley and fresh corn on the cob.

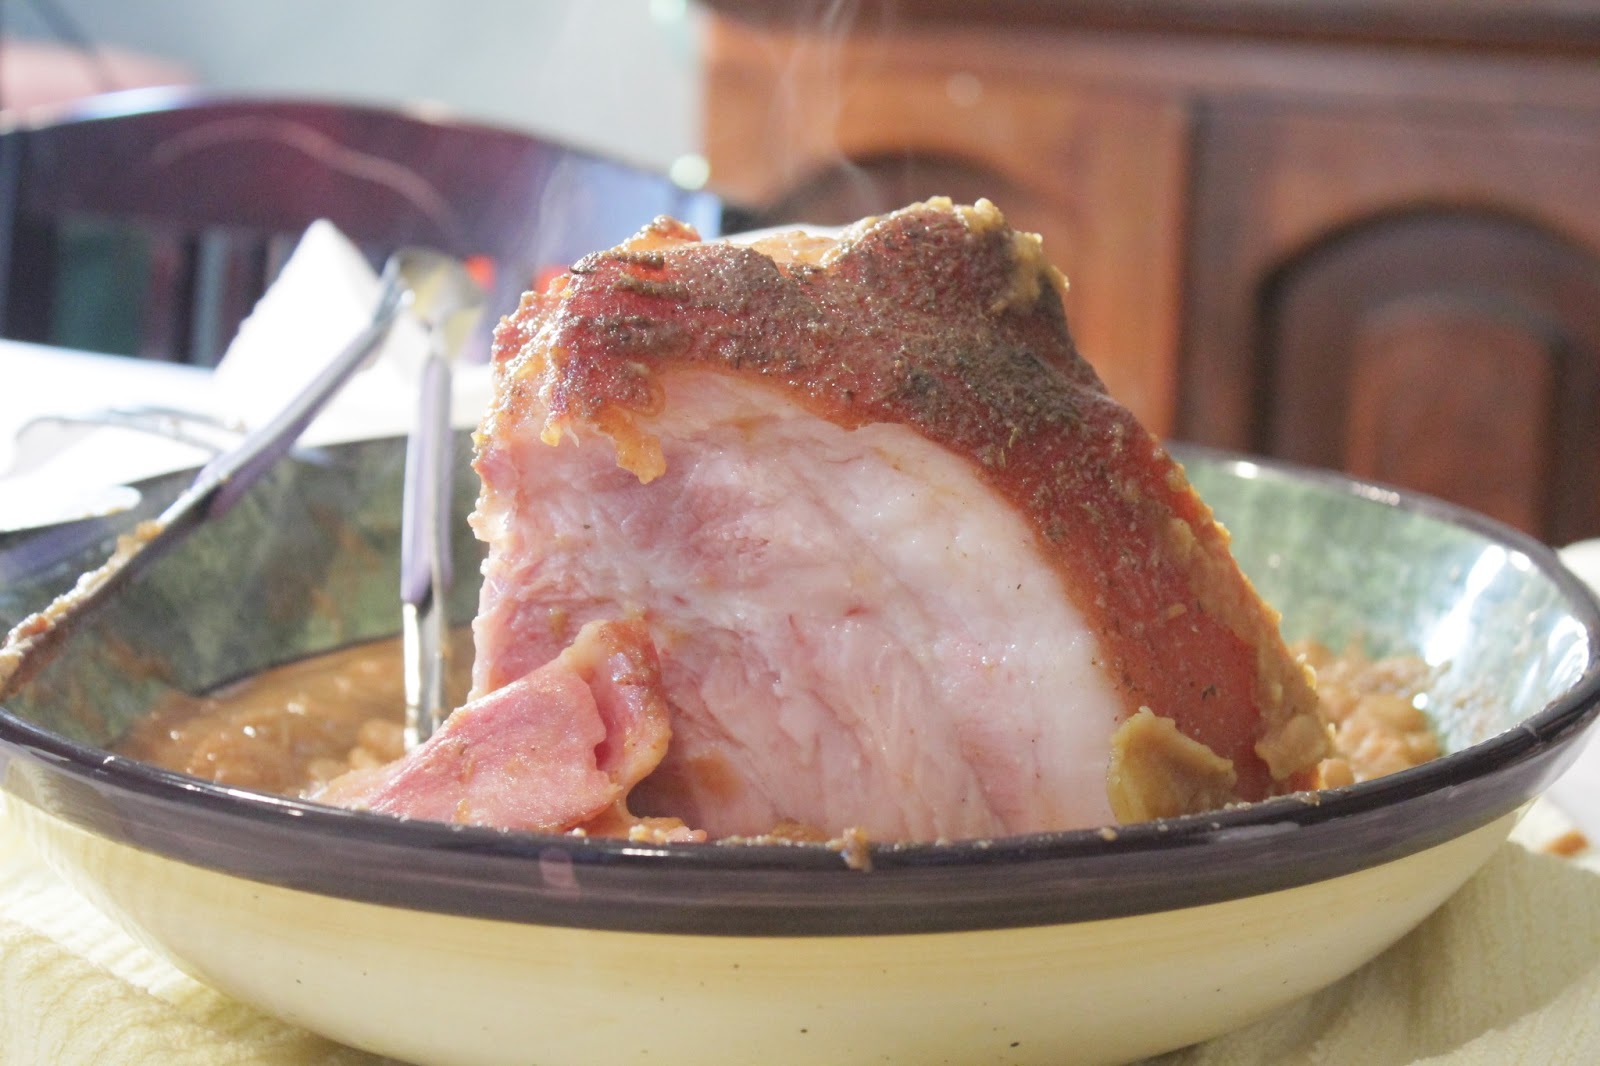
Ham with Limas


This being Easter Sunday, we joined a majority of the Western world and baked a ham - a ham that ended up nestled in a generous bed of large, succulent Jack Rabbit limas, cooked to perfection.

For our ham, Gareth made a quick spicy-sweet glaze on the stovetop out of butter, olive oil, brown sugar, and heavy cream with a little sriracha and a splash of habanero sauce. He seasoned it with a collection of nice earthy spices - a little each of nutmeg, cinnamon, thyme, sage, allspice, and mustard. The resulting sauce was first sticky-sweet and hot with the earthiness rising as the initial flavors receded. He coated the small half-ham generously with the glaze, then placed it on a rake in a heavy baking pan to cook at 350 for a few hours. while he prepared the beans.

Ham, glazed and ready for the oven


If you have a Korean rice maker, this is perfect for cooking beans, even it (like ours) the only thing not in Korean is the Quick Start button. It's actually a very effective pressure cooker. Three times on the 20-minute quick-cook setting, adding water in between each, gives you tender, moist beans. This is how we cooked our unseasoned limas while the ham was in the oven.

Once the beans were cooked, Gareth transferred them to a large pot. He pulled the ham from the oven and nestled it in the bed of limas. He then mixed the drippings with a little can of Goya tomato and poured it all over the ham and beans in the new pot, and cooked everything together cassoulet-style for about another 30 minutes. The limas continued to break down, allowing them to suck up all the ham fat and glaze, resulting in a pork and beans dinner our grandparents would be proud of.

Dinner is served


Sunday, February 10, 2013

Mini Po'Boy Sandwiches

February is a cold and dreary month, shortness being its best quality, for who could take more than 28 days of it? As the hours of sunlight increase, we know that spring will eventually arrive if only that cold wind would  just go away. I am huddled in my office looking at a crisp blue sky and a yard full of bright sunshine and am not taken in - it is hovering around the freezing mark today. Even the cat has taken refuge in my bed, having figured out how to turn on the electric blanket. Who among us can blame her?

The saving grace of February is the abundance of mid-winter festivals. Last weekend was Brighid's Day, marking the return of life into the cold dark world with the sprouting of grains and the birthing of sheep. This week brings us the Chinese New Year and Valentine's Day. It also brings us that famous festival to indulgence, the Mardi Gras.

Taken literally, Mardi Gras means Fat Tuesday. This French Catholic celebration is the last day of indulgence before practitioners enter their fasting season of Lent, attempting to emulate the self-induced privations of Jesus as he wandered the wilderness before arriving in Jerusalem to be arrested and crucified. For many modern-day Catholics, and those in other Christian sects, it means foregoing those small physical pleasures to help focus one's attention on the state of the spirit. While I personally think cold and endless February is not the best time for this type of contemplation, this does not stop me from a little Fat Tuesday activities in the cold days of February.

Mini po'boy sandwiches

My counterpart and I participated in on of those MeetUp groups. The one we joined is focused on cooking and food, and the organizer planned a little Cajun potluck on Saturday night. Our assignment was to provide an appetizer or side dish. Gareth decided on a New Orleans classic - the Po'Boy.

First, you will need to make a Roulade. For that you will need:


Mayonnaise
Mustard
Sriracha
Leek, minced
Onion, minced
Garlic, pressed through a garlic press
Salt and pepper
Pickles, minced - we used kosher dills
Lemon Juice

Make the mayonnaise as per usual. Gareth likes egg yolk, grape seed oil, and a little light vinegar. Reserve some for a little garlic mayo or a bread sauce if you like.

Then add the remaining ingredients, tasting as you go. If the sauce ends up too bitter, add a little squeeze of Karo light corn syrup. This will incorporate into the sauce more readily than granulated sugar, which will make your sauce gritty.

Then cook your fish. We used tilapia fillets. Gareth cut them to size, breaded them with potato starch, and slowly baked them in the oven.

Tilapia fillets, dusted with potato starch and ready for the oven


He also wanted some shrimp in there, so he steamed the medium sized (26-30 count) with just the slightest dusting of Old Bay.

Steaming shrimp


To complete the po'boy, we used butter lettuce, sliced tomatoes, and a little garlic mayonnaise.

Washed lettuce


Slicing tomatoes

We were going to serve ours on a baguette we bought at Wegman's (my bread-making has not ventured into this area yet), but our MeetUp host is a professional chef who was trained at the Culinary Institute of America.He had some sourdough that he baked in (I'm not kidding here) an adobe oven that he built in  his back yard. In suburban Maryland. In Joppatown, no less. Who knew?

Our sad grocery store baguette


Actual sourdough baguettes, cooked in an adobe oven


We cooked the fish in advance and assembled the sandwiches at the potluck. They were well received and fit right in with a spread that included coconut shrimp, jambalaya, roasted sweet potatoes, and the best red beans and bignettes I have ever had. We left with full bellies befitting the holiday and a warn feeling of belonging that comes from finding a group of kindred spirits.


Assembling the sandwiches


Ready to eat

Saturday, February 2, 2013

Bread for St. Brighid

February 2, or Groundhog Day, falls between the Winter Solstice and the Spring Equinox and from a solar perspective is the midpoint of winter. Before the legend of the groundhog and his shadow, it was a very different time. It was a time of cold and dark and hunger giving way to light and warmth as the days steadily grow longer. It is a time to look forward to the coming spring, to begin preparations for the planting when the cold fades away and the earth is once again soft and warm and open.

My European ancestors called this day I Mbolc, meaning "in the womb", for it was around this time of year that the first lambs were born. They gave thanks to the goddess of home and hearth and mother to all - Brighid. This ancient fertility goddess was so popular among my forebears that as Catholicism spread to these northern regions of the Holy Roman Empire, reverence for Her could not be stamped out. And so She became St. Brighid, Her feast day sanitized into Candlemas. And the firing of big bonfires in celebration of the Mother of All and the fertility of the world was transmuted into the lighting of candles in honor of the mother of Christ and her purification after childbirth as required under the law of her land. While the elements of motherhood and womanhood associated with Brighid and Her feast remained in tact, the festival was decidedly altered.

Even so, people in Britain, Wales, Ireland, Scotland, and other parts of Europe still leave an offering on their hearths to their ancient mother, as do I. A traditional offering is fresh bread and warm milk. In honor of the ancient mother of my people, and in remembrance of those who have come before me, whose blood flows in my veins and strengthens my heart, I made a little milk bread.


You will need:

4 teaspoons dry active yeast
1 1/4 cup warm milk
1 cup warm water
2 tablespoons butter, softened
2 tablespoons sugar
1 tablespoon salt
about 5 cups flour

Mise en Place


First preheat your oven to its lowest setting. This will be useful for helping your bread rise, especially in the winter.

Then warm your milk and water to between 105-115 degrees. You don't want it any hotter than that or you risk killing your yeast and turning your bread into a brick. I warmed my liquids by measuring them into Pyrex measuring cups and placing the cups in the oven while it was heating up. I  used a meat thermometer to gauge the temperature. If your liquids get too hot, let them cool until they are at the proper temperature.

This is hot enough


Once your liquids are warm, gently mix 1/4 cup of the milk with your yeast and let it rest for about 5 minutes or so - until the yeast has dissolved.

Yeast in milk


While that his happening, mix the rest of the milk and the water with your butter, sugar, and salt. Mix this gently until the sugar and salt have dissolved.

Add the yeast to the sugar mixture. Once combined, add three cups of the flour and stir it in until it is combined.

A wooden spoon is good for mixing the dough


Add the remaining flour, one cup at a time, using your hands to knead the dough together.

When it looks like this, it's time to use your hands


This is my favorite part of making bread. I love working the dough. It feels good in my hands, feels good to use my hands to make something. After a week of keyboard work, kneading dough gives your hands an opportunity to stretch. To me it always feels like a more natural movement. It lears my head and loosens the tension in my neck and shoulders. And then I have fabulous bread to boot.

And this is a fantastic dough - very smooth and elastic and easy to handle. It came together very easily for me.

Smooth and elastic and ready to rise


After kneading for about 10 minutes, your dough is ready for its first rise. Oil a large mixing bowl with a light oil - I used grape seed oil - and place your dough into the bowl, turning it over once to coat it. Cover it with a clean towel and place it in the warm oven to rise until doubled in size. In the warm oven, this will take about 45-60 minutes.

Once the first rise is complete, gently knead it again to release any air bubbles. You can knead it in the bowl or on a board. You can also dust it with flour if it feels sticky.

After the first rise


This bread recipe calls for a second rise. This can be done the same as the first rise. Or, if you need to leave the house to run errands, you can do a slow rise keeping the dough one the counter.

Whatever you choose, the second rise is complete when the dough has again doubled in size.

After the second rise, and much later in the day


Knead the dough to release any air bubbles, and shape it onto loaves. This recipe will make two full loaves, or six mini loaves. I made a combination of the two - one full loaf and three minis.

Place the shaped loaves in greased bread pans. I am partial to Pyrex as you can watch the progress of your bread through the glass. Cover the loaves with a towel and place in your warm oven for one last rise.

Keep an eye on things this time as you only want the dough to crest the bread pans. My dough did this in about 30 minutes.

Heat up your oven to 450. Bake the bread for about 10 minutes, then reduce the heat to 350 and bake for another 30 or so minutes.

This bread did not get nearly as brown as most breads get in my oven. This stuff stayed a nice milky white with golden edges, so I really had to trust the recipe.

Milky white bread with a golden crust


Once out of the oven, the bread easily slid out of my pans onto the wire rack to cool.

This bread has a solid crust and a salty flavor when eaten plain. My counterpart and I enjoyed some later in the day with unsalted butter and raspberry jam. In context, the bread was quite good and should work well with one of our typical dinners.


Bread and jam for Mary


I will leave a slice out on my hearth for Brighid this evening, my heart filled with hope for the coming spring and the return of warm and sunny days.

Monday, December 24, 2012

Holiday Baking: Mary Cherry Christmas Pie

When my counterpart and I started discussing Christmas dinner a few weeks back, I knew I wanted a cherry pie. I grew up in Northeast Wisconsin, and we spent our Christmases with my grandparents and cousins in Sturgeon Bay on the Door Peninsula, where orchards of tart cherries littered the landscape from Brussels bordering Kewaunee County in the south up to Gills Rock on the northern tip of the mainland where a ferry could take you to the islands on the very northern tip between Upper and Lower Michigan. Every Christmas, every holiday, ended with a tart cherry pie.

I haven't had a cherry pie for Christmas since that last Christmas with my grandmother in 2004. While I can usually count on my brother-in-law for a sweet potato pie - a regional favorite out here in Maryland - this year I decided that I was having a nice tart cherry pie like when I was a kid.

I have long been a fan of the basic pie crust in the Betty Crocker cookbook, but this year I deviated. I tried the Deluxe Butter Flaky Pastry Pie Dough from The Joy of Cooking, 1997 edition.

This is a double-crust recipe for a 10-inch pie. After recently discovering that my 9-inch pie pan is actually 9.5, I felt confident that this recipe would yield enough crust. For this pie crust, you will need:

2.5 cups all-purpose flour
1 teaspoon sugar
1 teaspoon salt
2 sticks of cold unsalted butter
1/4 cup vegetable shortening
1/3 cup plus 1 tablespoon ice water

Mix together your dry ingredients and set aside.

Cut your butter down into small pieces about 1/4 inch thick. Cut the butter into your dry ingredients using a pastry blender. The recipe - and really all pie crust recipes - claim you can use two butter knives cutting in a cross-wise motion against each other for this process. This has never worked for me, and I doubt it has worked for anyone. If you are a baker, even if only around the end of the year, get a pastry blender.

Now, the point of pie crust is fairly contrary to the point of many other baked items. For pie crust, you want to keep everything cold. Especially so with a butter crust like this one, so don't over work it. Cut everything together until there are still some pea-sized lumps of butter.

At this point, the recipe calls for the vegetable shortening, but also mentions that you can just use more butter if you like. The authors note that an all-butter crust is more difficult to work with. I was undeterred, and cut another half stick of cold butter into my dough.

The dough should still be pretty coarse but also somewhat mixed. Here's where I work it by hand, adding that ice water a little at a time. You want just enough to pull it all together. The third cup plus tablespoon was all I needed.

Divide it in half, shape each half into a flat disk, and chill for at least 30 minutes.

When the pie crust is chilling, I took a little rest, then moved on to the filling.I used the Cherry Pie with Canned or Bottled Fruit, also in The Joy of Cooking. For this filling you will need:

4 cups canned or bottled cherries, juice drained but 1/2 cup added back
1.25 cups sugar for tart cherries
3 tablespoons corn starch
1 tablespoon lemon juice - I used the juice from one lemon
1/4 teaspoon almond extract
2/3 tablespoons butter

I did not have any Door County cherries on hand, and I hear they are not as easy to come by as they used to be, most of the orchards having been sold or developed or let go to rot and ruin. This actually makes me quite sad. But, I had a good substitution with Oregon Tart Cherries in Water. I needed three 14.5 ounce cans to get the required four cups of fruit.

Oregon tart cherries - almost as good as my childhood memories of Door County


Mix the cherries and juice with the sugar, lemon juice, almond extract, and corn starch, and let the mixture sit for about 15 minutes.

Cherry pie filling


While it's sitting, you can preheat your oven to 425 and roll out your bottom crust. Despite the warning about the all-butter crust being difficult to work with, I had less trouble with this dough than with any other pastry dough I've ever attempted. I had enough to line my pie pan without tears or holes or patches. Cut off any overhang with a clean kitchen shears, leaving enough to crimp the top crust.


A single blemish on an otherwise perfect pie crust

If your 15 minutes have passed, pour the fruit filling into the pie crust and dot it with the butter.

Now, I know there are strong opinions among bakers about the lattice crust being the preferred topping for a fruit pie. A raging debate on this takes place in my own family. My niece has perfected the lattice top crust just to let us older women know that it really isn't that difficult. And it isn't. But, this is my Christmas pie, and I have something special in mind. So, I rolled out my top crust.

And reached for the Christmas tree cookie cutter. After some careful measuring, I determined where the center of my top crust would be and gently cut out five Christmas trees, tops pointing center. I used my pastry blade to ease the dough off the board and into position atop the pie, lining it up based on my measurements. I used the tried-and-true crimping tool of my forebears - a dinner fork - to secure the crust in place. Then, for the crowning touch, I took a small star cookie cutter and cut one out of the dough scraps. I used a little egg white to affix it to the center of my top crust to make Christmas pie perfection.


The top crust with Christmas tree cutouts


And in position atop the pie


So, whether you use a whole crust with vents or a lattice crust, bake your pie at 425 for about 30 minutes. Then, turn the oven down to 350 and slip a cookie sheet under the pie. Bake it for another 25-35 minutes, until the crust is golden and the filling is bubbling. During this second half of baking, use your nose to make sure the edges of the crust aren't overcooking. If they start to get too dark, cover them with foil.

Let the pie cool on a wire rack. You can store it at room temperature for only a couple of days, so clear a spot for it in the fridge.

The finished product - Mary Cherry Christmas Pie