Tuesday, January 29, 2013

How to Debone a Whole Chicken


There are many culinary techniques that have been lost to the common household cook over time. One such technique is deboning a whole chicken. And by that I mean removing the skeleton of the chicken while it is still whole. The benefits of this are 1) you have now turned your chicken carcass into a roast, and 2) once you remove the bones, you can fill in those spaces with dressing.


The LaRousse Gatronomique, in its section on chicken, describes how to debone a whole chicken in five easy steps (cut down the length of the backbone, remove the feet, separate the meat from the carcass, remove the carcass and bone each thigh from the inside, lay the bird out flat and stuff), complete with photos. My counterpart followed their steps, for the most part. And it's really not as difficult as you think if you follow their basic strategy, take your time, and start with very, very sharp knives.

First, cut the tips of the wings off and set aside. We did this right from the start, figuring it would be easier before the bird was all cut open.

Then, as per the Gastronimique, start with the spine. Laying the chicken on your board, breast side down, use your boning knife to cut the skin along the spine.


Continue using your knife to fillet the tissue from the bone, gradually working your way down the rib cage.


When you reach the wing, use your boning knife to pop the joints that connect the wings to the bird.  Cut through the joint using either your boning knife or your medium chef's knife and set the wing aside. The shoulder joint should already be popped, so cut through the tissue connected to that upper bone, and pull it out.


Repeat on the other side, and remove the skeleton.


The legs are a little trickier. Starting at the hip joint, cut down the length of the bone, gently easing the bone out until the knee joint is exposed. Pop that joint as well, and remove the thigh bone.


Using your boning knife, cut away the skin around the outside of the bottom of the drumstick, approximately the ankle of the chicken. Then, gently ease that drumstick bone out and set aside.

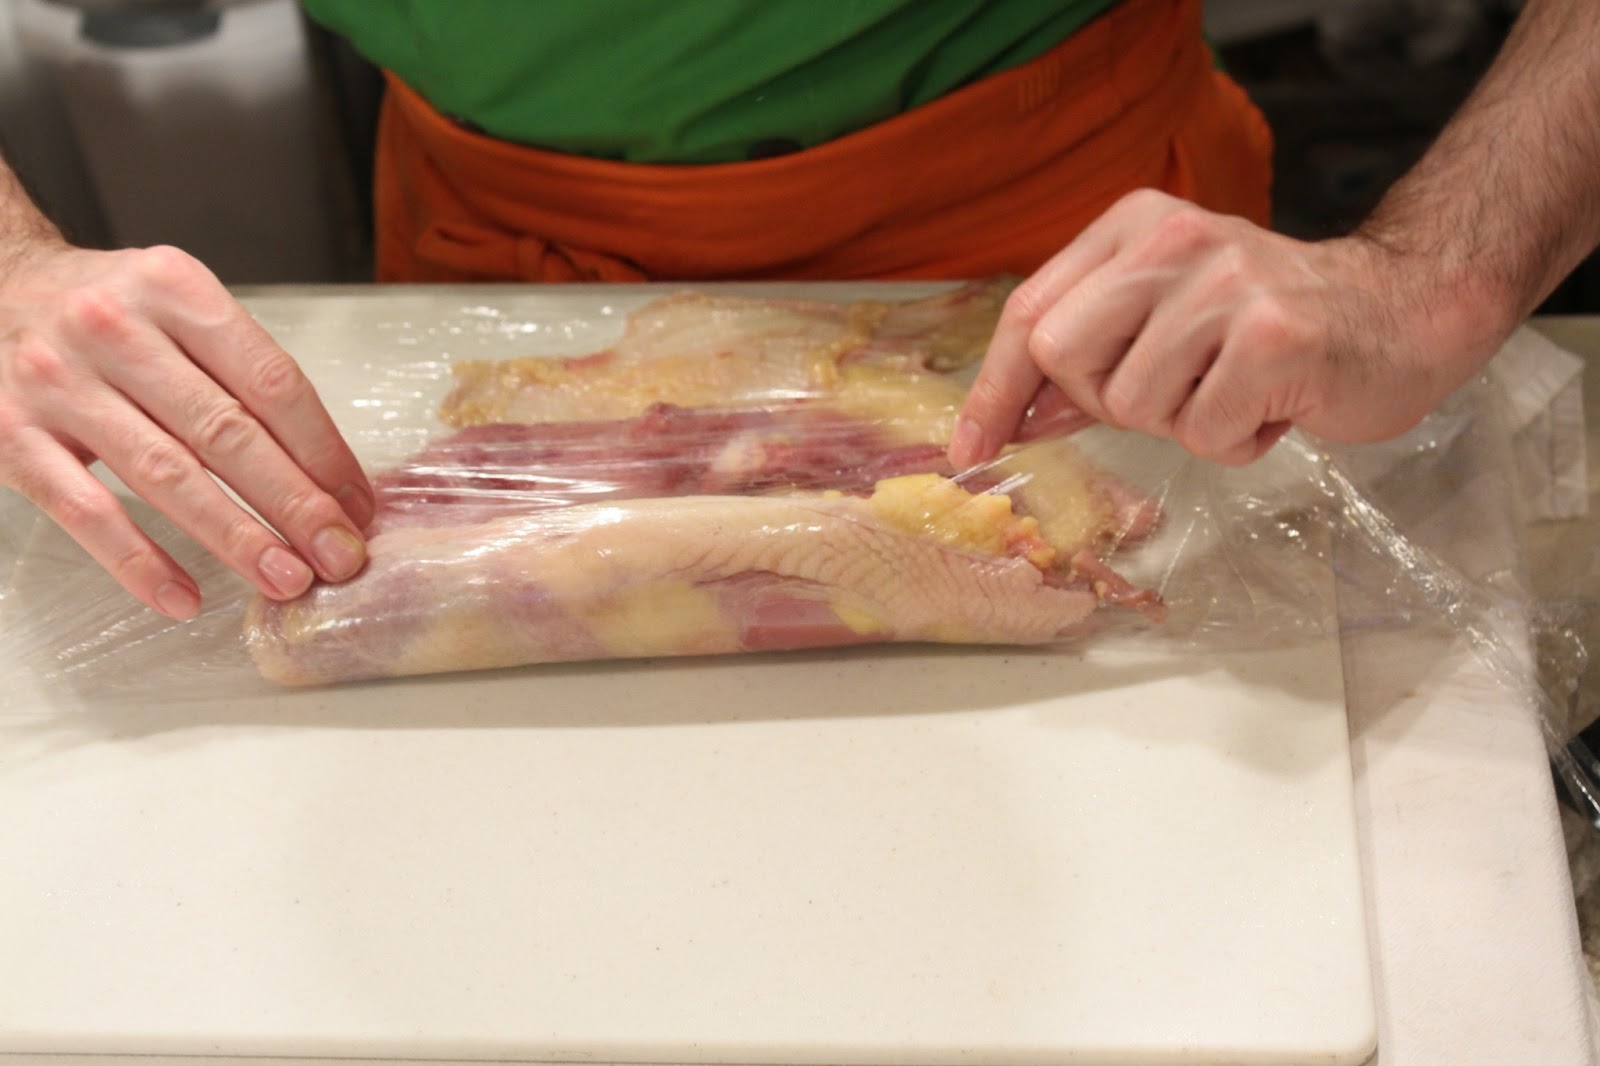
Take your bones and start a pot of stock. Flatten out your carcass and prepare to stuff.


The stuffing we used was made of the remains of a loaf of home-made bread, cut into cubes; the chicken giblets sauteed and minced; a little splash of the giblet cooking oil; and a dollop of home made mayonnaise  Do not underestimate the impact of a little home made mayo. It is, after all, egg yolk and oil, and what in the kitchen does not benefit from those two items?


To stuff the deboned bird, first fill in the cavities left by the wing and leg bones. Then, spread the remaining dressing over the rest of the inside of your chicken and close it up.


The traditional method for closing up a bird prepared in this manner is to sew the outside edges together. You can do this with a metal darning needle and some cotton thread. Be sure to check that your thread is cotton and not some synthetic before you sew it up and get it in the oven. Other wise you will have anxiety at the thought of the man-made, probably petroleum-based thread getting too hot and ruining your bird.


You can also bind the bird with kitchen twine following the technique described in my Roulade post.

Roast at 350 until the internal temperature reaches between 155 and 160. There are those among you who will gasp and insist that this is not hot enough. Trust me, it is. The best way to protect the delicate white meat from becoming dry and stringy is to not overcook it, and will help it survive reheating the next day. After the execution of the superior deboning technique, and the advanced meat-sewing technique, do not overcook this bird. You will regret it.


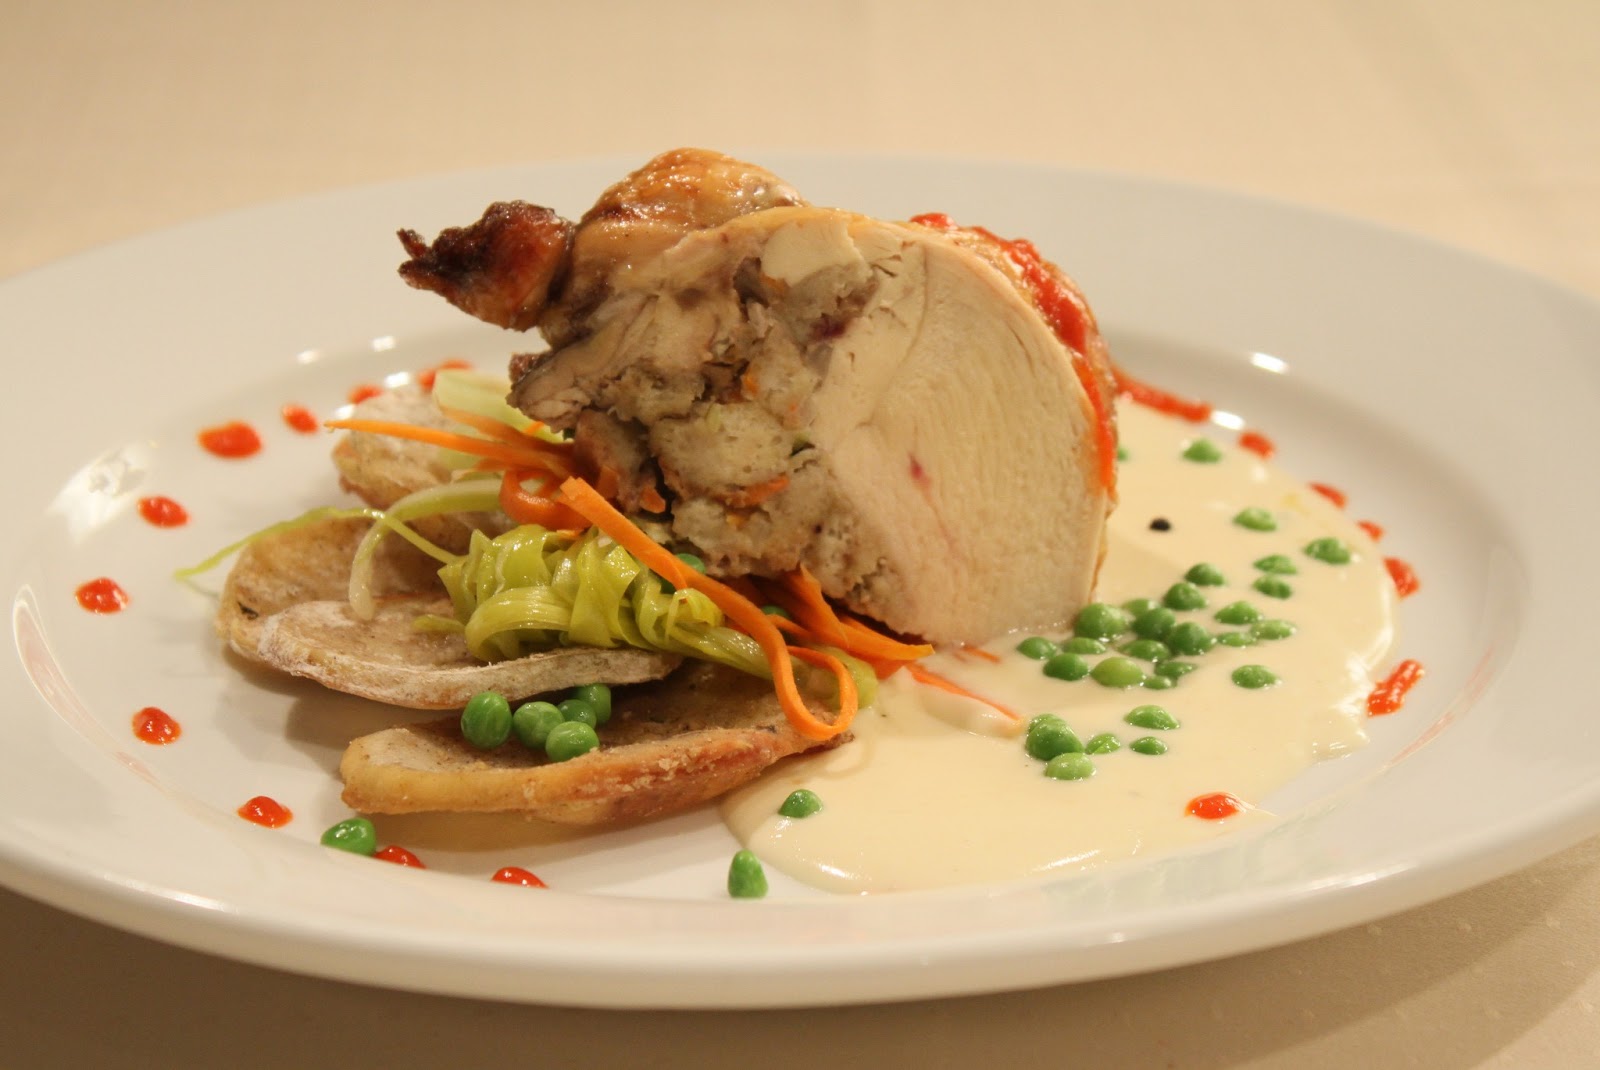
While our bird was roasting away, my counterpart steamed some carrots and leeks in a sieve over the stick pot, and prepared a sauce.


In keeping with the classic, old school preparation for the bird, Gareth made an equally classic - and equally forgotten - sauce: a thickened veloute. This is basically a white sauce of butter, flour, heavy cream, and stock with an egg yolk cooked at a low enough temperature so that the egg doesn't curdle, similar to a hollandaise. The result is a smooth and rich sauce with a silky texture almost like molten cream cheese.


Our chicken came out golden and delicious with lovely parts where the wings use to be that were really just stuffing and crispy skin. The breast meat was tender and moist. The veloute was the perfect accompaniment.


Monday, January 21, 2013

Birthday Dinner: Ballotine of Pheasant

Birthdays are special - any seven-year-old can tell you that. My birthday in particular is extra-special. And even though it is still a couple of days away, my extra-special birthday dinner was today.

A while back, a new cooking technique gained some attention - the Modernist technique. It gained attention for the $300 cookbook full of breath-taking photographs of culinary daring-do. A few years have gone by, and now there is a marketplace for the home gourmand who wants to try their hand at this.

We started at The Modernist Pantry with some basics, including meat glue. This is transglutaminase, or in layman's terms a binding enzyme. We had already decided on pheasant for my birthday. With the purchase of the meat glue, we determine what shape it would take.

Meat Glue


And I mean this quite literally. What meat glue allows you to do is deconstruct a piece of meat and put it back together however you like, what would in Modernist culinary terms be known as Reconstructed. And that's what we did.

The Pheasant

My counterpart prepped the pheasant last night. The concept here is that you want to skin and bone the bird keeping the skin intact. Then you take the boned meat and form a ballotine.


Now, here's where the meat glue comes in. As you reassemble your meat into the new ballotine shape, you use the meat glut to help hold it together.

It comes in a powder form that is triple sealed for its protection because it is sensitive to oxygen. It is stored in zero-oxygen containers filled with nitrogen for shipping. Not that meat glue is dangerous per se. You just don't want it to get airborne and then breathe it in. We covered our faces with those nice Russian cotton sack towels from Cook's Corner for this part. Then, Gareth very carefully pieced our pheasant back together using a small spoon to spread the glue on each piece.


Similar to a roulade, you'll want to use plastic wrap to help roll it up. Once rolled up and the ends secure, this will need to set for a few hours in the refrigerator. Ours set overnight and was fine.


The next day, we were ready to cook. This being our first try at this, we discussed whether or not to bind. We chose not to.


Gareth used some duck fat to brown the ballotine on the stovetop, and here is where we learned a lesson. Meat glue is some pretty neat stuff, but it's not magic. During the browning process, he had to shift gears and do a quick bind to keep things together.


Once browned, it was roasted in an oven at 350 until it reached an internal temperature of 150 - about 40 minutes.


The Sauce

We paired our pheasant with a clear celery sauce. Gareth used regular celery, Chinese celery, and celeriac root, along with white onion and leek. He cooked this slowly on the stovetop in a large saucepan with butter, adding water as needed to ensure that the veg did not start to brown.


Once the celery has become flaccid, transfer the entire contents of the pan to a large Pyrex measuring cup. Once the veg has become soft, it means that  the chemical bonds holding the vegetable together has broken down. It is through the breaking down of these chemical bonds that we extract flavor form food items.

Use an immersion blender to puree it, and then transfer it back to the saucepan and let it cook a little more. Then strain it off, separating off and retaining the liquids. This can be done fairly easily by setting up a sieve over your large measuring cup. Use a ladle to transfer the sauce into the sieve  Then use a spoon to agitate the puree to help the liquids filter through.


Once you have your liquid, transfer it back to the saucepan and let it simmer with some chopped leek and white onion. Gareth also used a little potato starch to thicken it.

The Veg

Gareth provided a wonderful mix of steamed vegetables to go along with this - ribbons of carrot and zucchini, celery hearts, a nest of zucchini, batonettes of leek, and a sprinkling of peas.


He sliced the ballotine and served it on top of toast rounds with the sauce and the veg.


Sunday, January 13, 2013

Spanish Rice

Despite the name, Spanish rice does not originate in Spain. It comes from Mexico, although there they do not call it Spanish rice - they just call it rice. Typically made from rice, tomatoes, and onions, there are many ways to make this dish in America. Ours may not be the most authentic, but is very tasty and satisfying on a cold day.

Mise en place

Aromatic and bitter veg


The most effective approach to Spanish rice is to treat it like risotto, first browning the rice in fat and then adding vegetables, liquids, and other ingredients and slowing simmering it until the rice is cooked through. Our fat of choice for this activity is bacon fat.

My counterpart actually starts with a ridiculous amount of bacon - almost a full pound. He cuts it down and browns it to extract the fat, and the uses some of this fat to brown the rice, reserving the cooked bacon to add to the dish a little further down in the process.

Cutting down the bacon


Browning the bacon to extract all that yummy fat


You'll want to cook the bacon until it is fairly firm. A soft bacon is a weak bacon, and it won't hold up once it is added back into the dish.

The bacon is just about there


Once fairly well cooked, remove it from your pan with a tongs and set aside. Drain most of the bacon fat out of the pan, reduce the heat, and add the uncooked rice.

Save this for later


Using a small ladle  gently add some of the bacon fat around the edges of the pan. The fat is still pretty hot, and we don't want to cook the rice too quickly.

Gradually mix the fat and the rice together with a spatula, scraping the bottom of the pan to incorporate those delicious bacon sucs into the rice.

Once the rice turns a uniform white, you can being adding some of your veg. At this point, add onions, garlic, and hot peppers, like jalapenos or serranos. We are partial to leek, so we add some of that as well.

Adding the onions and peppers


As the veg releases its liquid, continue to scrape the sucs off the pan, using a deglazing motion. Once the peppers and onions have cooked a bit, you can add some fresh diced tomatoes. They will add more liquid which will help the rice cook. You can also add some chicken stock and the juice from some stewed tomatoes to keep things moist. Add some red bell pepper toward the end.

Look at that packaging - Kumatos are the D'Artagnan of tomatoes


Slice and dice


Time for the Dutch oven


Once the tomatoes have cooked, it's time to move everything to a Dutch oven or stock pot. Here's where you'll add your spices. Most of the spices my counterpart uses are the aromatics: lots of paprika and sriracha, plus a little allspice and clove. He also adds some dried oregano for a little bitter, some balsamic vinegar for a little tang, and some Thai fish sauce for a little umami, along with good old salt, white pepper, and sugar.

Man at work


That's a lot of paprika


A little olive oil is also nice. Not all the fat should be animal fat.

At the end , you'll want to add the reserved bacon, some of those stewed tomato, plus a small can of jalapeno tomato sauce from the Latino section of the grocery store. Once that has been incorporated, use that jalapeno tomato sauce can to add more water, filling it three times.


Everything's better with a little jalapeno salsa

A little olive oil for our health

Drop two pats of butter on top,  and bake in the oven at 350 until all liquid is absorbed. Ours took about an hour.  This is what it looks like when it's done cooking:


What you end up with is a rich, spicy, tomatoey rice dish that hits most of the major flavor points. Give it a stir, plate it up, and serve with a cheesy sour cream sauce and fresh cilantro topped with a poached egg.

In the pot


On the plate